
Lawn
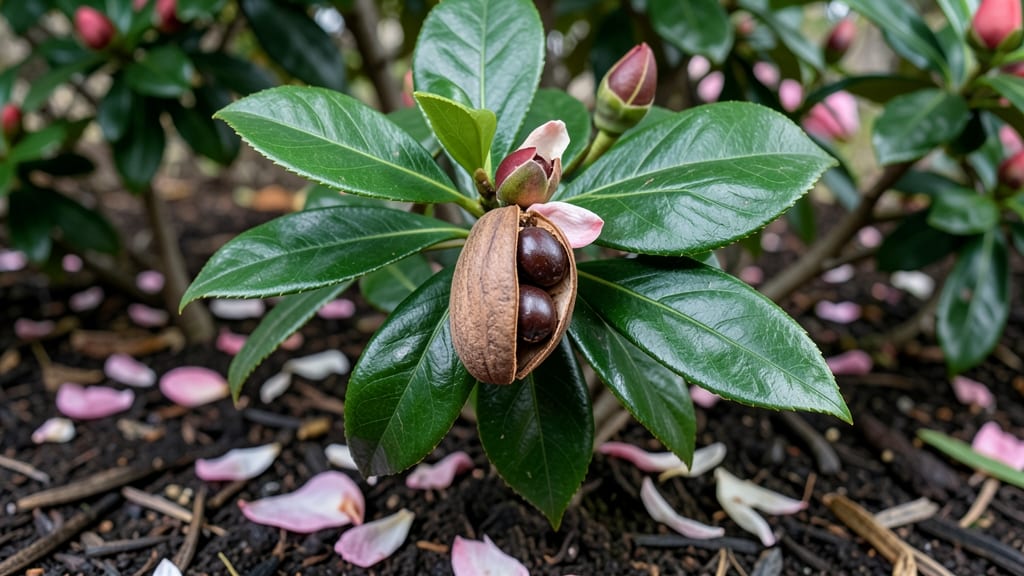
That woody camellia seed pod holds the key to growing your own stunning shrub—if you know the cold-moisture trick. 🌱 The secret to breaking dormancy and coaxing those seeds to sprout lies in mimicking winter's slow, steady moisture, not rushing them through heat.
I've struggled with stubborn camellia seeds for years, but this method finally cracked the code after three failed attempts.
First, you'll need mature pods (they turn brown and dry in late fall) and a patient approach—think weeks, not days. The process starts by extracting the seeds, giving them a good soak in warm water overnight, then placing them in a damp paper towel inside a sealed bag.
This keeps them moist without drowning them, which is where most growers go wrong.
By the time spring rolls around, you'll see tiny roots peeking through the towel, ready to transplant into pots. The seedlings grow slowly at first but develop into sturdy plants that reward you with glossy leaves and—eventually—those prized blooms.
The trickiest part is waiting through the cold stratification period, but it's what makes the difference between success and disappointment.
This method works best for Camellia japonica and Camellia sasanqua varieties, though some hybrids may need extra patience. The payoff? Homegrown camellias that thrive in your climate and outperform nursery plants. Let's get those seeds sprouting!
📚 In This Guide
- What you need
- Instructions
- Tips and common mistakes
- Wrapping up and next steps
What you need
- ● Fresh camellia seed pods: 3–5 mature, plump pods (harvested in late fall/winter when fully ripe and brown). Pro tip: 💡 Avoid pods with cracks or mold—they won’t germinate well!
- ● Well-draining potting mix: 2–3 gallons of a peat-free blend (60% coco coir, 30% perlite, 10% vermiculite). Why? Camellia roots hate soggy soil!
- ○ Small pots or seed trays: 4–6 containers (4–6 inches deep) with drainage holes. Optional: Clear plastic domes or plastic wrap to retain moisture.
- ● Sphagnum moss or seed-starting mat: For cold-moisture stratification (see step below).
- ● Spray bottle: With room-temperature water (avoid tap water if it’s chlorinated—let it sit out for 24 hours first!).
- ● Plastic zip-top bags: 2–3 gallon-sized bags (for humidity control).
- ● Pruning shears or sharp knife: For carefully opening seed pods (sterilize with rubbing alcohol first!).
- ● Thermometer: To monitor temps during stratification (ideal range: 35–45°F).
- ● Grow lights or sunny windowsill: Bright, indirect light (12+ hours/day) once sprouts emerge. No grow lights? A south-facing window works in a pinch!
- ○ Fertilizer (optional): A balanced, water-soluble 10-10-10 or fish emulsion (diluted to half-strength) for seedlings (use after 4–6 weeks).
- ○ Patience & a humidifier (optional): Camellia seeds can take 3–6 months to germinate—stay consistent!
Step-by-step instructions for germinating camellia seeds using the cold-moisture method
This foolproof technique mimics nature's winter cycle to break dormancy and coax stubborn camellia seeds to sprout.
🌱 Step 1: Harvest and Prepare the Seed Pods
Collect mature camellia seed pods when they turn brown and begin splitting open naturally. You'll know they're ready when the seeds inside are plump and firm—not shriveled or hollow. Remove the seeds carefully, scrubbing off any remaining pulp with a damp cloth. This prevents mold and gives your seeds a clean start.
Place the cleaned seeds in a bowl of lukewarm water for 24 hours. This softens the tough outer shell and kickstarts hydration. You'll see the seeds plump up slightly as they absorb moisture. Drain and pat them dry gently with a paper towel afterward—don't let them sit in water, or they'll rot before germinating.
💧 Step 2: Stratify Seeds in Moist Peat Moss
Fill a small plastic container with moistened peat moss (keep it damp but not soggy—squeeze a handful to check; water should drip out slowly). Arrange the seeds 1 inch apart in a single layer, pressing them lightly into the moss. Cover the container with plastic wrap, poking a few small holes for airflow. This mimics the moist, cool conditions of a forest floor.
Place the container in your refrigerator's crisper drawer (the coldest spot without freezing). Keep it there for 6-8 weeks, checking monthly to ensure the moss stays barely moist. You're not looking for sprouts yet—just dormancy breaking. If mold appears, discard the batch and start fresh with sterilized moss.
☀️ Step 3: Transition to Warmth and Light
After 6-8 weeks of cold stratification, remove the container and place it in a warm, bright spot (around 65-75°F). You'll want indirect light at first—think dappled sunlight through a sheer curtain. Mist the moss lightly every 3-4 days to maintain moisture without drowning the seeds.
Germination can take 2-4 weeks after this move. Watch for tiny white roots breaking through the moss first, followed by a small green shoot. Once you see ½-inch sprouts, it's time to transplant. Don't rush this—waiting ensures strong roots develop before handling.
🪴 Step 4: Pot Up Seedlings Carefully
Fill small 2-inch pots with a mix of 50% peat moss and 50% perlite for drainage. Gently lift each seedling by its leaves (never the stem) and place it in its own pot, burying up to the first set of true leaves. Press the soil lightly around the base to secure it without compacting.
Keep the pots in a humid environment (like a clear plastic tent over a seed tray) for the first 2 weeks. Water from the bottom by placing pots in ½ inch of water for 10 minutes, then draining. This prevents fungal issues while encouraging deep root growth. You'll see new leaves emerge within 3-4 weeks—that's your signal everything's working.
⏰ Step 5: Gradually Acclimate to Outdoor Conditions
After 8-10 weeks of indoor growth, when seedlings have 4-6 true leaves, it's time to harden them off. Start by placing them outside in a shaded, sheltered spot for 1 hour daily. Gradually increase exposure over 2 weeks, moving them to morning sun first, then partial afternoon shade.
Transplant outdoors after the last frost, choosing a location with partial shade and well-draining soil. Camellias hate soggy roots, so amend the planting hole with compost and sand if your soil is heavy. Mulch heavily around the base to protect roots during temperature swings—they'll thank you with faster growth next season.
Tips & tricks for germinating camellia seeds
These practical insights will help you navigate the delicate process of breaking dormancy and achieving reliable germination.
Seed Selection: The 24-hour lukewarm water soak is your first critical step—don't skip it! This isn't just about hydration; it's about softening that tough outer shell that would otherwise block moisture penetration. I've seen seeds that looked perfect on the outside fail to germinate because they weren't properly soaked. After the 24 hours, they should feel noticeably plumper to the touch. If they still feel hard, give them another 6-12 hours in fresh water.
Stratification Setup: When arranging seeds 1 inch apart in the moist peat moss, think of them like snowflakes—each needs its own space to develop. I learned this the hard way when I crowded seeds too closely, leading to mold before germination even began. The plastic wrap with tiny holes creates the perfect microclimate. If you notice condensation forming on the inside, that's good—it means you've got the right moisture balance. Just make sure those holes stay clear so airflow doesn't get blocked.
Temperature Watch: The refrigerator's crisp drawer keeps things at a steady 35-40°F, which is perfect for breaking dormancy. But here's what nobody tells you—the seeds aren't actually germinating during this 6-8 week period. They're just getting ready. That's why you shouldn't expect to see any action until after you move them to warmth. If your fridge runs hotter than 40°F, consider moving the container to a cooler spot or even the bottom shelf of your freezer (but never freezing—just cooler than the crisp drawer).
Light Transition: When you move the container to that warm, bright spot (65-75°F), indirect light is key. Direct sunlight can cause the moss to dry out too quickly, while too little light means weak, leggy seedlings. I place mine near an east-facing window where they get morning sun but afternoon shade. The 3-4 day misting schedule is non-negotiable—set a reminder! The moss should feel like a wrung-out sponge, not dripping wet or bone dry.
Pro Tips for Camellia Seed Pod
- These practical insights will help you navigate the delicate process of breaking dormancy and achieving reliable germ...
- Seed Selection: The 24-hour lukewarm water soak is your first critical step—don't skip it! This isn't just about hydr...
- Stratification Setup: When arranging seeds 1 inch apart in the moist peat moss, think of them like snowflakes—each ne...
Frequently asked questions
Got questions about growing camellia seed pods?
You’re not alone! Here are some of the most common queries—and straightforward answers—to help you succeed with this finicky but rewarding process.
How long does it take for camellia seed pods to germinate?
Patience is key! With the cold-moisture trick, germination typically takes 4–12 weeks. Some seeds may sprout faster (2–3 weeks), while others need up to 3 months. Keep the soil consistently moist and warm (65–75°F) to encourage speedy growth.
Why isn’t my camellia seed germinating after stratification?
If seeds aren’t sprouting, check these fixes:
- Moisture levels: Too dry? Use a spray bottle to keep soil damp (not soggy).
- Temperature: Too cold (<50°F) or too hot (>85°F) can stall germination. Aim for 60–70°F.
- Seed viability: Old or damaged seeds may fail. Test freshness by cutting open a pod—look for plump, firm seeds.
- Light exposure: Some growers cover seeds with 1/4 inch of soil; others leave them exposed. Experiment!
Can I grow camellia seeds indoors without a greenhouse?
Use a clear plastic dome or ziplock bag over a seed tray to create humidity. Place the tray on a seedling heat mat (or near a sunny window) and rotate daily for even light. Once sprouts appear, remove the cover gradually to avoid damping-off (a fungal disease). Pro tip: A south-facing window or grow lights work well!
Are there alternatives to growing camellia from seed?
Yes! If seeds seem too tricky, consider:
- Layering: Propagate from semi-hardwood cuttings in late summer/early fall (rooting hormone helps!).
- Grafting: For rare varieties, grafting onto a hardy rootstock is reliable (best done by experienced gardeners).
- Buying seedlings: Nurseries often sell young camellia plants, though they may lack the heirloom charm of homegrown seeds.
What should I do if mold appears on my seed pods?
Mold is a red flag—act fast! Stop watering immediately and improve airflow by:
- Removing the plastic cover (if used) for 1–2 hours daily.
- Sprinkling cinnamon or hydrogen peroxide (3%) on the soil to fight fungus.
- Repotting affected seeds into sterilized, well-draining soil.
Wrapping up and next steps
Growing camellia seed pods may seem tricky, but with the cold-moisture trick and patience, you’ll soon be nurturing these stunning plants! 🌱 The key is mimicking nature’s rhythm—stratification and consistency—while avoiding common pitfalls like overwatering or impatience.
Your efforts will reward you with vibrant blooms and lush foliage in just a few seasons.
Ready to take the next step? Start by planting your prepped seeds in well-draining soil and keep an eye on their progress. Share your journey with fellow gardeners or explore camellia care tips to troubleshoot early challenges. Happy growing—your garden (and future camellias!) will thank you! ✨