
Lawn
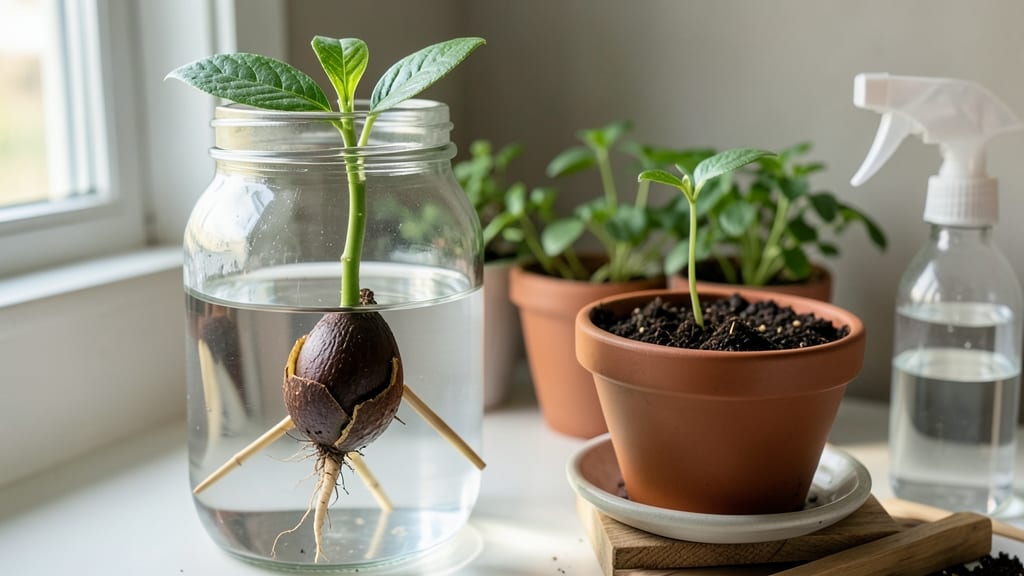
Making an avocado seed sprout is one of those satisfying projects that turns kitchen scraps into a living plant. 🌱 The key isn't just patience—it's creating the right conditions where the seed feels safe enough to grow roots into a glass of water.
I've sprouted dozens, and the ones that follow these steps reliably produce roots in about 60 days, not the months some guides suggest.
All you need is a fresh avocado pit, three toothpicks, a glass jar, and a little warm water. The toothpicks prop up the seed so the bottom half sits in water while the top stays dry, mimicking how it would grow in soil.
Keep the water level steady—never let it dry out, but don't drown the seed either. A sunny windowsill or grow light works best, as long as it stays above 65°F.
Within a few weeks, you'll spot tiny white roots curling into the water, and by day 60, they'll be a foot long if you're consistent. The real magic happens when you transplant it into soil—suddenly, that kitchen experiment becomes a houseplant that can live for years.
The first leaves unfurl slowly, but once they do, your avocado tree is officially on its way to becoming a statement plant.
This method works in any home with basic supplies, and it's a great project for kids or anyone who wants to see nature's resilience in action. The biggest mistake?
Skipping the toothpick step and letting the seed rot in water. Stick with it, and you'll have a thriving seedling before you know it.
📚 In This Guide
- What you need
- Instructions
- Tips and common mistakes
- Wrapping up and next steps
What you need
- ● 1 fresh avocado pit (preferably from an organic or pesticide-free avocado for best results)
- ● 3–4 toothpicks or small skewers (for balancing the pit)
- ● 1 small glass or jar (wide-mouth, ~16 oz or larger)
- ● Water (room temperature, filtered if possible)
- ● Potting soil (well-draining, organic mix recommended)
- ● A small pot or container (4–6 inches in diameter, with drainage holes)
- ● Scissors or a sharp knife (for trimming the pit)
- ● Hydroponic setup (if skipping soil initially)
- ● Plant food or compost (for faster growth)
- ● Spray bottle (to mist leaves gently)
- ● Grow light or sunny windowsill (if natural light is limited)
- ● Humidity dome or plastic wrap (to retain moisture early on)
Step-by-Step instructions for growing avocado roots at home
Here's how I've sprouted avocado seeds reliably—no fancy tools, just patience and a few simple tricks.
🌱 Step 1: Prepare the Seed for Planting
Start with a fresh avocado pit—one that still has its brown skin attached. Rinse it gently under water to remove any fruit residue, then let it dry completely. The skin helps prevent rot later, so don't peel it off yet.
Use a clean knife to carefully remove any remaining fruit pulp from the bottom (where the stem was). Look for the small dimple where the root will emerge—this is your target spot. Soak the pit in warm water for 24 hours to soften it slightly, but don't let it dry out during this time.
🪴 Step 2: Set Up the Water and Support System
Fill a glass or jar with 3-4 inches of water—just enough to cover about 1 inch of the seed's bottom. Place the pit in the water with the dimple-side down. The top half should remain dry. Prop the pit upright using 3-4 toothpicks or small wooden skewers, wedging them into the sides so it stays steady.
Change the water every 2-3 days to keep it fresh. You'll see roots emerging from the dimple in 2-6 weeks, depending on warmth and humidity. Place the jar in a spot with bright, indirect light—a windowsill facing east or west works best. Avoid direct sun, which can overheat the water.
💧 Step 3: Monitor Root Growth and Prepare for Transplanting
Once roots reach 2-3 inches long, they're ready for the next phase. Healthy roots should be white or pale tan and firm to the touch. If they turn brown or mushy, the water's too stale—rinse the roots and refresh the water immediately.
At this stage, you'll notice tiny green sprouts emerging from the top of the seed. This is your signal to transition from water to soil. Wait until roots are at least 3 inches long before planting—longer roots mean a stronger plant later. Keep the jar in the same bright, indirect light during this time.
🌿 Step 4: Plant the Seedling in Soil
Fill a 6-inch pot with well-draining potting mix—avoid garden soil, which can compact and suffocate roots. Make a small hole in the center, about 1-2 inches deep, and place the avocado seed in with the roots pointing downward. The top half should remain above soil level.
Gently press the soil around the seed to secure it, but don't pack it down tightly. Water lightly until the soil feels evenly moist (not soggy). Place the pot in bright, indirect light again—avoid full sun for the first 2 weeks to prevent leaf scorch. Keep the soil consistently moist but never waterlogged.
☀️ Step 5: Care for Your Growing Avocado Plant
After 2-3 weeks in soil, you'll see true leaves (not the initial sprouts) emerge. This is when your plant starts needing more light. Gradually introduce it to morning sun for 1-2 hours daily, then increase exposure over 1-2 weeks until it gets 4-6 hours of sunlight. Avoid harsh afternoon sun until the plant is established.
Water when the top inch of soil feels dry—stick your finger in to check. Avocado plants are drought-tolerant once mature, but seedlings need consistent moisture. Fertilize lightly with a balanced houseplant fertilizer every 4-6 weeks starting at 3 months old. Prune any yellow or damaged leaves immediately to encourage healthy growth.
Tips & tricks for perfect avocado seed sprouting
These simple tricks will help you avoid common pitfalls and grow strong roots every time.
Seed Selection: Choose a pit from a ripe, organic avocado whenever possible. The fresher the fruit, the better your chances of success. I've noticed that Hass avocados (the most common variety) tend to sprout more reliably than other types. Look for a seed that feels heavy for its size—this indicates it's fully developed and has good potential.
The Soak Secret: During that 24-hour soak in Step 1, don't be tempted to speed things up by using hot water—warm is perfect. I learned this the hard way after accidentally using boiling water, which actually damages the seed's delicate structure. Keep the water level just high enough to cover the bottom inch, and change it if it gets cloudy before the 24 hours are up.
Root Health Check: When monitoring those 2-3 inch roots in Step 3, pay close attention to color. Healthy roots should be crisp and white or pale tan. If you notice any brown or black spots, that's your signal to act fast—rinse the roots immediately and refresh the water. I've found that adding a tiny pinch of cinnamon (just a sprinkle) to the water can help prevent fungal growth without harming the seed.
Transplant Timing: Wait until roots reach at least 3 inches before planting—this gives your seedling the best chance to establish itself. I've seen many beginners rush this step, and their plants often struggle to adapt. Once planted, keep the soil consistently moist but never soggy. The first 2 weeks are critical for root development, so be patient and resist the urge to overwater.
Pro Tips for Make An Avocado Seed Sprout
- These simple tricks will help you avoid common pitfalls and grow strong roots every time.
- Seed Selection: Choose a pit from a ripe, organic avocado whenever possible. The fresher the fruit, the better your c...
- The Soak Secret: During that 24-hour soak in Step 1, don't be tempted to speed things up by using hot water—warm is p...
Frequently asked questions
about growing an avocado seed sprout—here’s what you need to know before you start!How long does it take for an avocado pit to sprout?
With consistent care, you’ll typically see roots emerge in 2–6 weeks, while full sprouting (roots + leaves) can take 6–12 weeks. Patience is key—keep the toothpicks and water levels stable to speed up the process! If nothing happens after 8 weeks, check for rot or dryness and adjust your method.
Can I grow an avocado seed in water forever?
No—while you can keep it in water indefinitely, roots and sprouts thrive best when transplanted to soil after 4–6 weeks. Water alone lacks nutrients, and the seed may rot or grow weak. Once roots reach 2–3 inches, transfer it to a pot with well-draining soil for healthier growth.
What if my avocado pit only grows roots but no leaves?
Don’t worry! Roots first is normal, but if leaves don’t appear after 8–10 weeks, try these fixes:
- Increase light exposure (place near a sunny window or use a grow light).
- Check for overwatering—roots need air too!
- Fertilize lightly with diluted seaweed or compost tea.
Can I eat the avocado sprouts if they grow?
While the sprouted seed itself isn’t edible, the leaves and stems are safe to consume in small amounts (like microgreens). However, they’re bitter and not a common food source. Focus on growing the seed for fun or as a houseplant—it’s more rewarding (and tastier) to enjoy avocados from the store!
What’s the best alternative if my avocado pit won’t sprout?
Try these easy alternatives for guaranteed sprouts:
- Mango pit: Follow the same toothpick method—often sprouts faster!
- Orange pit: Less common, but possible with patience (may take months).
- Store-bought avocado seedlings: Skip the wait and buy a pre-sprouted plant online.
Wrapping up and next steps
Growing an avocado seed into a thriving plant is a rewarding journey that blends patience with a little creativity! 🌱 By following these simple steps—from selecting the right seed to nurturing it with care—you’ve unlocked the potential to watch roots sprout in just 60 days.
Whether you’re a gardening newbie or a green-thumb pro, this project is a fun way to connect with nature and even enjoy a future avocado tree.
Now that you’re ready to start, why not take it further? Once your seedling grows, transplant it into a pot with well-draining soil and keep the adventure going. Who knows—you might just grow a plant that one day bears fruit! Happy sprouting! 🌿✨