
Lawn
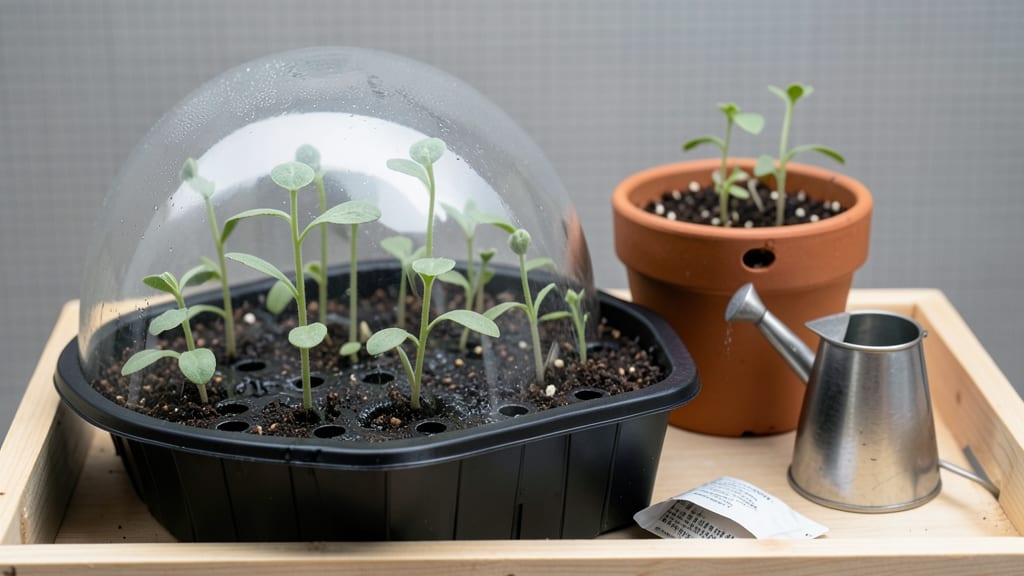
Those tiny zinnia sprouts you just planted could become your next zero-waste harvest—if you avoid the two biggest mistakes most beginners make. 🌱 I’ve saved seeds from my zinnia plants for years, and the difference between healthy sprouts and leggy failures comes down to light, moisture, and timing.
Skip the guesswork with these simple steps that turn fragile seedlings into strong, twist-free plants ready for transplant.
The secret to happy zinnia sprouts starts with a warm, bright spot—think 70-75°F and full sunlight (or a grow light just 2 inches above them). Overwatering is the silent killer here: keep the soil barely damp, not soggy, and use a spray bottle instead of pouring.
Most damping-off happens when people drown their seeds in enthusiasm. Within 7-10 days, you’ll see those first true leaves—dark green and sturdy, not pale and stretched.
By the time those sprouts hit 2 inches tall, they’ll be ready for their next phase: hardening off before transplant. The twist-free harvesting comes later, when you let a few blooms go to seed and collect them without damaging the stems.
But first, you’ve got to get them through this critical window where one wrong move can send them spiraling toward disaster. Trust me, your future seed-saving self will thank you.
This method works for any zinnia variety—dwarf, giant, or everything in between—and scales from a sunny windowsill to a greenhouse setup. The key is consistency: same light, same water, same patience. Once you master these sprouts, you’ll never buy zinnia seeds again. Let’s get those little stems standing tall.
📚 In This Guide
- What you need
- Instructions
- Tips and common mistakes
- Wrapping up and next steps
What you need
- ● Zinnia seeds: 1–2 packets (organic, non-GMO preferred; ~50–100 seeds per packet). Choose heirloom varieties for seed-saving!
- ● Seed-starting soil: 1–2 small pots (4–6 inches deep) or a seed tray with sterilized potting mix (avoid garden soil—it may harbor pests).
- ● Watering can or spray bottle: With a fine mist nozzle (overwatering is the #1 enemy of sprouts!).
- ○ Clear plastic dome or ziplock bag: (Optional but helpful for humidity—see tips below!)
- ● Grow lights or sunny windowsill: Zinnias need 6–8 hours of light daily. A basic LED grow light (~$20–$40) works if natural light is lacking.
- ● Small hand trowel or spoon: For gently transplanting sprouts (if not using a tray).
- ● Labels & markers: To track seed varieties (trust us, you’ll forget!).
- ● Twine or rubber bands: (For twist-free harvesting—your secret weapon!)
- ● Pruning shears: Sharp, clean pair for harvesting mature flowers.
- ○ Paper towels or egg cartons: (Optional) For pre-sprouting seeds faster (see tips!).
- ● Warmth: Zinnias thrive in 70–75°F (21–24°C) soil. A sunny windowsill or heat mat (for trays) helps.
- ● Patience: Sprouts emerge in 7–14 days—stay consistent with moisture!
- ● Space: Even a tiny balcony or kitchen counter works for early stages.
Step-by-Step guide to twist-free zinnia seed harvesting
Here's how to save zinnia seeds without the usual messy twist-and-pull method—clean, easy, and zero-waste.
🌱 Step 1: Select the Right Zinnia Heads
Wait until the zinnia blooms have fully matured and turned brown—this signals the seeds are ready. Gently squeeze a dried bloom between your fingers; if the seeds rattle inside, they're perfect for harvesting. I always pick heads that have been closed for at least 3-5 days to ensure full ripeness.
Use clean, sharp scissors to snip the entire flower head from the stem, leaving about 1 inch of stem attached. This helps prevent dirt and debris from contaminating your seeds. Place the cut heads in a paper bag or envelope to keep them dry until you're ready to process them.
💧 Step 2: Dry the Flower Heads Thoroughly
Spread the harvested zinnia heads out on a clean, dry surface in a well-ventilated area. I like to use a baking sheet lined with parchment paper or a piece of cardboard. Avoid direct sunlight, as it can overheat the seeds and reduce their viability. Let them dry for 3-5 days until the flower heads feel brittle and crumble easily when touched.
Check daily for any signs of moisture or mold. If you notice dampness, spread them out again and let them dry for another day. Proper drying is critical—seeds that aren't fully dry will spoil in storage.
✂️ Step 3: Extract Seeds Without the Twist
Once the flower heads are completely dry, hold one head over a clean bowl or envelope. Gently rub the dried head between your palms or use a fork to scrape out the seeds. The seeds will easily separate from the dried petals and stems, leaving you with clean, dry seeds ready for storage.
I find that a fork works best for stubborn seeds—just scrape the head lightly along the tines to release them without damaging the seeds. Avoid shaking the heads too hard, as this can cause seeds to scatter or get lost.
🪴 Step 4: Store Seeds Properly for Next Season
Transfer the extracted seeds into a labeled envelope or small paper bag. I always include the variety name and the year harvested on the label to keep things organized. Store the seeds in a cool, dry place, like a pantry or seed storage box, where they'll stay viable for 2-3 years.
For extra protection, you can place the envelope inside a sealed plastic bag with a small packet of silica gel to absorb any moisture. This ensures your seeds stay fresh and ready for planting next season without any waste.
⏰ Step 5: Plant Your Saved Seeds
When it's time to plant, sprinkle the seeds directly onto prepared soil, covering them lightly with ¼ inch of soil. Zinnia seeds germinate best in warm soil, so wait until the soil temperature reaches at least 60°F before sowing. Keep the soil consistently moist until the seedlings emerge, which typically takes 7-14 days.
Once the seedlings are about 2 inches tall, thin them to ensure each plant has enough space to grow. This step is crucial for strong, healthy zinnia plants that will produce beautiful blooms all season long.
Tips & tricks for perfect zinnia seed saving
Here's what nobody tells you about harvesting zinnia seeds without the usual mess.
Timing is Everything: In Step 1, that 3-5 day waiting period after the blooms turn brown is non-negotiable. I learned this the hard way after trying to harvest seeds too early—underripe seeds won't germinate properly. Look for those fully brown, crispy flower heads that crumble easily when you gently squeeze them. This is your green light to harvest!
Drying Strategy: When drying your flower heads in Step 2, I recommend using a mesh produce bag instead of parchment paper for better airflow. Place the bag in a dark, well-ventilated area (like a closet with the door slightly open) to prevent overheating. The 3-5 days drying time might feel long, but patience here prevents mold and ensures seed viability. Check daily by gently squeezing—if they still feel damp, give them another day.
Seed Extraction Hack: For Step 3, I've found that using a clean coffee filter works better than paper bags for collecting seeds. The fine mesh catches even the smallest seeds while allowing debris to fall through. If you're dealing with stubborn seeds, try gently tapping the dried head against the side of your bowl rather than rubbing—this releases seeds without damaging them. And always work over a clean surface to avoid cross-contamination.
Storage Wisdom: In Step 4, when storing your seeds, I add a small piece of uncooked rice to the envelope along with the silica gel. The rice helps absorb any residual moisture in the air that might not be caught by the gel alone. Label your envelopes with both the variety name and harvest year—this becomes invaluable when you're ready to plant next season. Trust me, you'll thank yourself when you're sorting through your seed collection a year later!
Pro Tips for Zinnia Seed Sprouts
- Here's what nobody tells you about harvesting zinnia seeds without the usual mess.
- Timing is Everything: In Step 1, that 3-5 day waiting period after the blooms turn brown is non-negotiable. I learned...
- Drying Strategy: When drying your flower heads in Step 2, I recommend using a mesh produce bag instead of parchment p...
Frequently asked questions
Got questions about growing zinnia seed sprouts?
Here are some of the most common ones—plus quick, practical answers to help you grow thriving plants with minimal fuss!
How long does it take for zinnia seeds to sprout?
Zinnia seeds typically sprout within 5 to 10 days after planting, depending on temperature and moisture. Keep the soil consistently moist (not soggy!) and place them in a warm spot (around 70°F) for the fastest results. Patience is key—if they haven’t sprouted in 2 weeks, try replanting fresh seeds.
Can I plant zinnia seeds in cold weather?
Zinnia seeds hate the cold and won’t germinate well in temperatures below 50°F. Wait until after the last frost (usually late spring) or start them indoors 4-6 weeks before the last frost date. If you’re in a cooler climate, consider using a seedling heat mat to speed up germination.
What if my zinnia sprouts look weak or leggy?
Leggy sprouts usually mean they’re stretching for light. If this happens, move them to a sunnier spot (at least 6-8 hours of sunlight daily) or use a grow light. Thin crowded seedlings to 12-18 inches apart to improve airflow and prevent competition. A weak sprout? Try snipping it at the base and replanting—sometimes they’ll recover!
Can I save seeds from store-bought zinnias?
Yes! If you let some zinnia flowers fully mature and dry on the plant, you can harvest seeds for next year. Wait until the petals fall off and the seed heads turn brown. Twist the dried head gently to release seeds—store them in a cool, dry place for up to 2 years. Just avoid hybrid varieties (they may not grow true to form).
What’s the best way to harvest zinnia seeds without wasting them?
For zero-waste seed saving, let a few flowers go to seed in your garden. Once the petals drop, twist the seed head off and place it in a paper bag to dry. Shake the bag to release seeds, then store them in an envelope. Skip the water soak—zinnias don’t need scarification! This method keeps your garden sustainable and cuts down on waste.
Wrapping up and next steps
Growing zinnia seed sprouts isn’t just rewarding—it’s a zero-waste way to keep your garden thriving year after year! With the right twist-free harvesting techniques and simple seed-saving methods, you’ll enjoy vibrant blooms and sustainable seeds.
Whether you’re a seasoned gardener or just starting, this approach makes seed saving effortless and eco-friendly.
Ready to level up your garden game? 🌱 Start by saving seeds from your healthiest zinnias this season—your future plants (and pollinators!) will thank you. Happy harvesting!