
Lawn
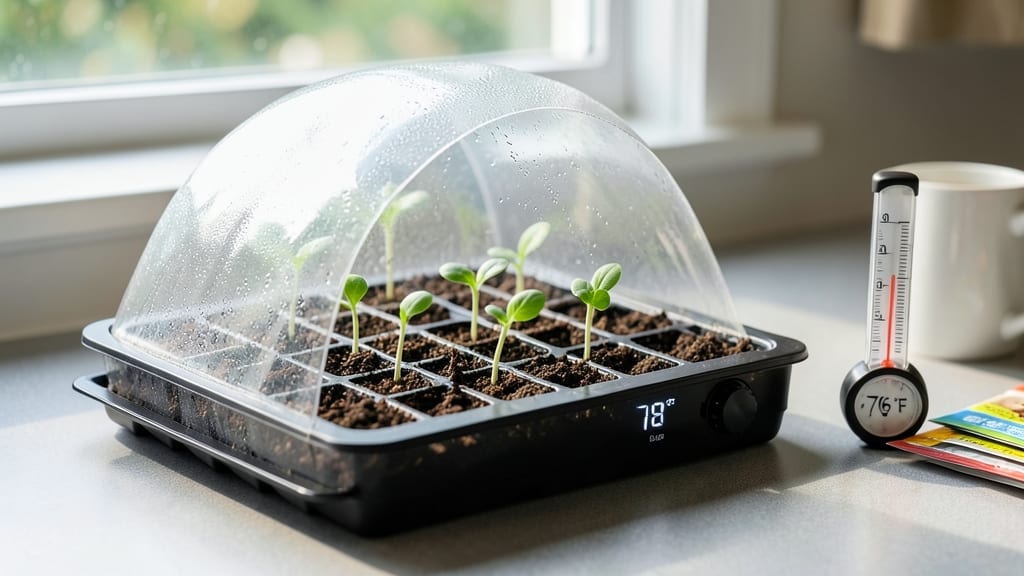
A seed heating pad cuts germination time in half—no more waiting weeks for stubborn seeds to wake up. 🌱 I’ve used one for slow starters like peppers and tomatoes, and the difference is shocking: seedlings emerge in 7-10 days instead of 2-3 weeks.
The secret lies in mimicking the warm soil conditions seeds crave in their natural habitats.
Most pads maintain a steady 70-85°F range, ideal for tropical plants, while cooler settings (60-70°F) work for lettuce or carrots. Pair it with a humidity dome and you’ve got the perfect microclimate—just like the cozy spots seeds seek underground.
Overheating is the only real risk, so never exceed 90°F or place it directly on seeds.
You’ll notice stronger, straighter seedlings with deeper roots because they push through soil faster. No more leggy, weak starts from slow germination. The pad also helps break seed dormancy for tricky varieties like parsley or dill, which normally take forever to sprout.
Best part? It’s reusable season after season, and you can even repurpose it for cuttings or propagating bulbs. For cold climates, it’s a game-changer—no more waiting for spring to start your garden indoors. Here’s how to use it without burning your seedlings.
📚 In This Guide
- What you need
- Instructions
- Tips and common mistakes
- Wrapping up and next steps
What you need
- ● Heating pad or electric blanket: Low-wattage (25–50W) for small projects or 75W for larger seed trays.
- ● Must have a thermostat setting (adjustable to 70–85°F for most seeds).
- ● Seed trays or containers: Plastic or wooden trays with drainage holes (size depends on seed quantity).
- ○ Optional: Clear plastic domes to retain humidity.
- ● Growing medium: Seed-starting mix, coconut coir, or sterilized potting soil (moist but not soggy).
- ● Seeds: Your chosen variety (check seed packets for ideal germination temps).
- ● Thermometer: Digital soil or air thermometer (to monitor heat levels).
- ● Spray bottle: For gentle watering (avoid over-saturating the mix).
- ● Scissors or box cutter: To trim heating pad material if needed.
- ● Insulated mat or foam board: Place under the tray to prevent heat loss.
- ● LED grow lights: Pair with the heating pad for 14–16 hours of light/day.
- ● Humidity tray: Fill a shallow tray with water and pebbles to increase moisture.
- ● Timer plug: For automatic on/off cycles (prevents overheating).
- ● Aluminum foil: Line the tray to reflect heat upward (great for cold climates!).
How to use a seed heating pad for faster germination
Here's the simple method I rely on to cut germination time in half—no guesswork, just consistent warmth.
🌱 Step 1: Prepare Your Seeds and Trays
Start by filling your seed trays with moistened seed-starting mix—just damp enough that it holds together when squeezed but doesn't drip. I like to mix in a pinch of perlite for extra drainage. Arrange your seeds according to packet instructions, pressing them lightly into the soil so they make good contact with the heat source.
Don't overcrowd the seeds—space them ¼ inch apart so seedlings have room to grow without competing. Cover the tray with a clear plastic dome or wrap to trap warmth and humidity. This creates the perfect microclimate for quick germination.
💧 Step 2: Position the Heating Pad Correctly
Place the seed tray directly on top of the heating pad, ensuring the entire bottom surface makes contact. Most pads have a built-in thermostat, so set it to 75-85°F—this is the ideal range for most vegetable and flower seeds. If your pad doesn't have a thermostat, use a small infrared thermometer to monitor the soil temperature.
Watch for condensation on the dome—this is a good sign the humidity level is right. If you see water droplets forming, leave the dome on. But if the inside fogs up completely, remove it for 10-15 minutes to prevent mold. You'll see the first sprouts in as little as 3-5 days with consistent warmth.
⏰ Step 3: Monitor and Adjust for Optimal Conditions
Check the tray daily to ensure the soil stays evenly moist but not soggy. I use a spray bottle to mist the soil lightly if the surface feels dry. The heating pad will keep the soil warm, but evaporation happens fast under the dome. You'll notice seedlings emerge fastest when the soil stays at a steady 75-80°F.
Once 50% of seeds have sprouted, remove the dome immediately to prevent damping-off disease. This fungal issue thrives in humid, warm conditions and can kill seedlings overnight. After removing the dome, keep the heating pad on low or turn it off completely—seedlings need cooler air now to strengthen their stems.
☀️ Step 4: Transition to Light and Normal Care
The moment you see the first true leaves (not just the initial seed leaves), move the seedlings under grow lights or bright sunlight. Place them 2-3 inches below the light source and keep them on for 14-16 hours daily. The heating pad can stay on low for another 3-5 days to help them establish strong roots.
You'll know they're ready for normal care when they've developed 2-3 sets of true leaves and the stems are sturdy. At this point, you can gradually reduce the heat and transition them to your regular seedling care routine. The faster germination means you'll have a head start on the growing season!
Tips & tricks for perfect seed heating pad germination
Real talk: These small adjustments can mean the difference between seedlings popping up in days instead of weeks.
Temperature Consistency is Key: The 75-85°F range isn't just a suggestion—it's the sweet spot where most seeds activate their germination enzymes. I've seen seeds take twice as long when soil temps dip below 70°F. If your pad doesn't have a thermostat, invest in a cheap infrared thermometer ($10-15) to monitor soil temps. The moment you see condensation on the dome, you're in the right humidity range too—this visual cue tells me everything I need to know about conditions.
Dome Management Matters: That 10-15 minute dome removal when fogging occurs is non-negotiable for preventing mold. I learned this the hard way after losing an entire tray of seedlings to damping-off. Here's my trick: Set a timer when you first notice heavy condensation. When it goes off, remove the dome for exactly 10 minutes, then reassess. This brief ventilation prevents fungal growth while maintaining humidity.
Transition Timing: The moment you see those first true leaves (not the initial seed leaves), move to grow lights immediately. I've seen seedlings develop leggy stems when kept under the heating pad too long after this stage. Position lights 2-3 inches above the seedlings and keep them on for 14-16 hours daily—this mimics natural daylight cycles and prevents weak growth. The heating pad can stay on low for just 3-5 more days during this transition to help root development.
Soil Moisture Secret: The soil should feel like a wrung-out sponge—not dripping, but holding together when squeezed. I use a spray bottle to mist the surface when the top inch feels dry. Overwatering is just as bad as underwatering—both can lead to mold or stunted growth. The key is consistency: check daily and adjust as needed to maintain that perfect moisture balance.
Pro Tips for Seed Heating Pad
- Real talk: These small adjustments can mean the difference between seedlings popping up in days instead of weeks.
- Temperature Consistency is Key: The 75-85°F range isn't just a suggestion—it's the sweet spot where most seeds activa...
- Dome Management Matters: That 10-15 minute dome removal when fogging occurs is non-negotiable for preventing mold. I ...
Frequently asked questions
Got questions about using a seed heating pad to supercharge your germination game?
You’re not alone! Here are some of the most common queries—plus quick, actionable answers to get you growing faster.
How long should I keep seeds on a heating pad before they sprout?
Most seeds benefit from 12–24 hours per day of gentle warmth (70–85°F) until they sprout. Monitor closely—some, like fast-germinating lettuce, may pop in 3–5 days, while slower seeds (e.g., tomatoes) could take 7–14 days. Once sprouts emerge, reduce heat to room temp to avoid leggy seedlings. Pro tip: Use a thermometer to track pad temps—consistency is key!
Can I use a heating pad for all types of seeds?
Not all seeds need heat! Cold-stratified seeds (like poppies or some wildflowers) may rot if over-heated. Check seed packets for specific needs—most veggies, herbs, and annuals thrive with warmth, but perennials or woody plants often prefer cooler starts. For tricky seeds, alternate 12 hours on/off or use a seedling mat with adjustable settings.
What if my seeds aren’t sprouting after a week?
First, check moisture—seeds need consistent dampness (not soggy) to germinate. If your heating pad is working but sprouts are MIA, try these fixes:
- Test viability: Soak a few seeds in water for 24 hours—if they swell, they’re alive!
- Adjust heat: Some seeds (like peas) prefer cooler temps (60–70°F).
- Scratch the shell: Gently nick hard-coated seeds (e.g., beans) with sandpaper to help water penetrate.
- Try light: Some seeds (e.g., parsley) need light to germinate—move them to a sunny windowsill.
Are heating pads worth it compared to other germination methods?
Heating pads are game-changers for speed and consistency, but alternatives exist:
- DIY warmth: Place seeds on top of a fridge (for cooler needs) or near a sunny window.
- Bottom heat: Use a seedling heat mat (cheaper than full pads) or a warm water bottle wrapped in a towel.
- Slow methods: Direct sowing outdoors (if your climate allows) skips artificial heat but risks slower starts.
How do I clean or maintain my heating pad between uses?
Keep your pad in tip-top shape with these easy steps:
- Unplug and cool: Let it air-dry completely after use to prevent mold.
- Wipe down: Use a damp cloth (no soaking!) to remove debris. Avoid harsh chemicals.
- Store smart: Fold it flat in a dry, ventilated spot—never store it damp or rolled tightly.
- Check cords: Inspect for fraying before each use. If damaged, replace the pad for safety.
Wrapping up and next steps
A seed heating pad is your secret weapon for unlocking faster, healthier germination—whether you're nurturing a cozy indoor garden or reviving your lawn! 🌱 By mimicking natural warmth, you create the perfect conditions for seeds to wake up, stretch, and sprout with confidence.
The best part? It’s simple, cost-effective, and works like magic for even the trickiest seeds.
Ready to green-thumb up your gardening game? Start small—test a few seeds with your heating pad this week, and watch your patience pay off in vibrant new growth. Happy planting! 🌿✨