
Propagation
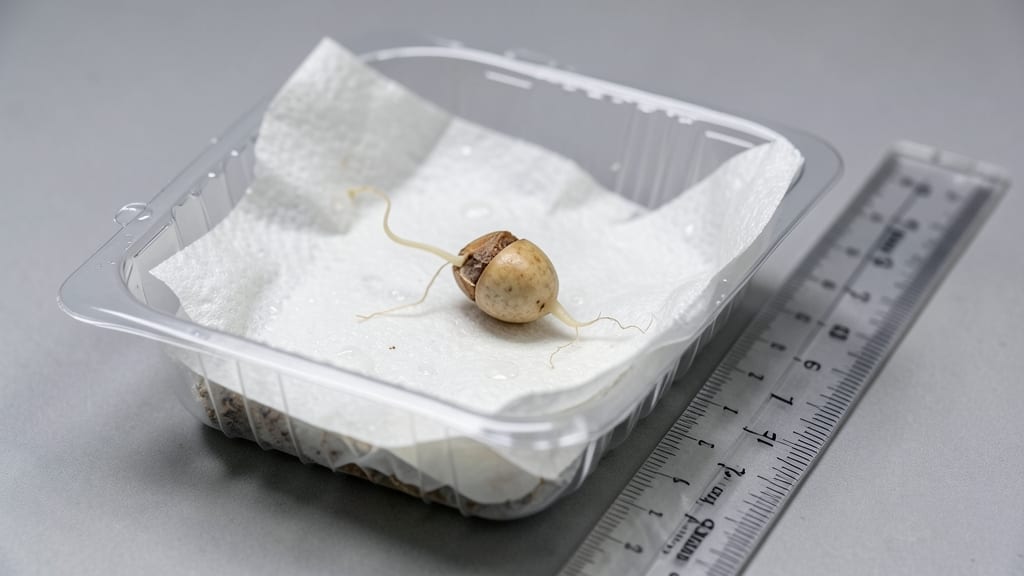
Seed germination definition is when a dormant seed awakens and starts growing—think of it as nature’s way of hitting the reset button. 🌱 The magic begins with imbibition, where the seed soaks up water and swells, breaking its protective shell.
This triggers the radicle (the first root) to push downward, followed by the shoot reaching upward toward light.
Viability is everything—old or damaged seeds often fail to sprout. Test yours by soaking in water: if they sink, they’re likely good; if they float, they’re probably past their prime.
Temperature and moisture play starring roles too: most seeds germinate best between 60-80°F, with consistent dampness (not sogginess) to keep them happy.
By the time you see those first green shoots, you’ve given the seed everything it needs: warmth, water, and patience. The soil stays loose and crumbly, never compacted, so those tiny roots can spread freely.
Within 5-14 days (depending on the seed), you’ll have a thriving sprout ready to transplant.
This process works for everything from fast-sprouting radishes to slow-and-steady oak trees. The key is matching your seeds’ needs—some want light, others prefer darkness. Once you master germination, your garden’s future is in your hands.
📚 In This Guide
- What you need
- Instructions
- Tips and common mistakes
- Wrapping up and next steps
What you need
- ● Seeds: Choose high-quality, organic seeds (e.g., radish, broccoli, lentils, or sunflower). Start with 1–2 teaspoons per tray (about 50–100 seeds, depending on size).
- ● Germination Tray or Container: Plastic seedling trays (with drainage holes) 1–2 units (10x20" or similar).
- ● Glass jars (quart-sized, for sprouting) 1–2 jars (with a mesh lid or cheesecloth).
- ● Paper towels or germination mats (unbleached, seed-safe) 2–3 sheets per tray.
- ● Water: Room-temperature, filtered water (avoid chlorinated water—let it sit out for 24 hours if tap water is used). 1–2 cups per batch.
- ● Spray Bottle: 8–16 oz (for gentle misting; avoid over-saturating seeds).
- ● Light Source: Grow lights (LED, full-spectrum, 12–16 inches above seeds).
- ● Sunny windowsill (south-facing, 6+ hours of indirect light/day).
- ● Scissors or Knife: For cutting paper towels/mesh to fit containers.
- ● Mesh Lid or Cheesecloth: To cover jars/trays (allows airflow while keeping seeds contained).
- ○ Humidity Dome: (Optional) Creates a mini greenhouse effect for faster germination.
- ○ pH Test Strips: (Optional) Ensures water is neutral (pH 6.0–7.0).
- ● Labeling Tags: To track seed types and planting dates.
- ○ Fertilizer (Diluted): (Optional) Seaweed extract or compost tea for nutrient boost after sprouting.
Science-backed steps for reliable seed germination
Here's how to transform seeds into thriving sprouts using proven horticultural principles.
🌱 Step 1: Understand the Four Key Germination Requirements
Germination demands four non-negotiable conditions: moisture, oxygen, proper temperature, and light (or its absence, depending on the seed). Most gardeners focus only on water but overlook that seeds need 60-70% humidity around them to prevent drying out. I always pre-soak seeds for 12 hours in lukewarm water to soften the seed coat and jumpstart hydration.
The temperature window varies by species—cool-season crops like lettuce thrive at 55-65°F, while tropical plants need 75-85°F. You'll see faster germination when these ranges are met consistently. Oxygen access is equally critical; compacted soil suffocates seeds, so I never press planting mix down firmly—just firm it gently to prevent air pockets.
💧 Step 2: Prepare the Planting Medium and Sow Seeds Correctly
Use a sterile seed-starting mix (never garden soil) to prevent damping-off disease. Fill your container to 1 inch below the rim, then water until moisture reaches 1 inch deep—you'll know it's right when excess water drains freely from the bottom. The goal is evenly damp, not soggy, conditions throughout the medium.
Sow seeds at the correct depth—twice the seed's diameter is the golden rule. Tiny seeds like lettuce go ¼ inch deep, while large seeds like beans need 1 inch. I use a toothpick to create individual holes for precision planting. Cover lightly with additional mix, then mist the surface until it looks uniformly damp but not wet.
☀️ Step 3: Control Light and Temperature for Optimal Sprouting
Most seeds germinate best in darkness—light triggers germination in some species (like morning glories) but inhibits others (like tomatoes). Cover containers with a damp paper towel or place them in a dark, warm spot until you see white radicles (the first root) emerge. This usually takes 3-7 days, depending on the seed type.
Once sprouts appear, move them to bright, indirect light immediately. You'll notice seedlings stretch toward any light source if they're not getting enough—this is called etiolation, and it weakens stems permanently. A grow light positioned 4 inches above seedlings provides ideal conditions. Maintain 65-75°F temperatures consistently; fluctuations slow or halt germination.
✂️ Step 4: Monitor and Maintain Ideal Conditions Post-Germination
After the first true leaves appear (not the initial seed leaves), thin seedlings to 1 plant per cell if overcrowded. Use scissors to snip at soil level—never pull, or you'll disturb roots. Water from the bottom now to prevent fungal diseases; place containers in a tray of water for 10-15 minutes, then drain completely.
Watch for yellowing leaves or mushy stems—these are early signs of overwatering or damping-off. Reduce humidity slightly by removing any plastic domes and increase airflow with a small fan on low setting. You'll see stronger, more resilient seedlings when these conditions are met consistently.
⏰ Step 5: Transition to Light and Harden Off Young Plants
When seedlings have 2-3 sets of true leaves, gradually introduce direct sunlight for 1-2 hours daily, increasing exposure by 30 minutes every other day. This hardening-off process prevents transplant shock. You'll notice leaves developing a deeper green color and stems thickening as they adapt.
After 10-14 days of hardening, seedlings are ready for transplanting. Choose a cloudy day to minimize stress, and water deeply before and after moving them to their permanent location. The key is patience—rushing this step results in weak, leggy plants that struggle to establish.
Tips & tricks for perfect seed germination
A few science-backed details that'll transform your seed-starting success rate from hit-or-miss to consistently reliable.
Precision Timing for Pre-Soaking: The 12-hour pre-soak in Step 1 is non-negotiable for most seeds—it's when the seed coat softens enough for water to penetrate. I use a fine-mesh strainer in a bowl of lukewarm water to prevent seeds from floating away. For larger seeds like beans, you'll notice tiny cracks forming in the seed coat after about 8 hours, signaling it's time to plant.
Temperature Control Strategy: Those 55-65°F and 75-85°F ranges in Step 1 aren't just suggestions—they're biological triggers. For cool-season seeds, I place containers on top of my fridge (never inside) where it maintains a steady 60°F. For tropical seeds, a seedling heat mat set to 78°F works wonders. Fluctuations of just 10°F can double germination time.
Light Transition Technique: When moving seedlings from darkness to light in Step 3, do it gradually over 24 hours. Start with just 1 hour of indirect light on day one, then increase by 1 hour daily. This mimics natural conditions and prevents the shock that causes etiolation. I've seen seedlings that would have stretched to 6 inches instead grow just 2 inches taller when transitioned this way.
Harden-Off Visual Cues: In Step 5, watch for these three signs your seedlings are ready for direct sun: leaves develop a waxy sheen, stems thicken noticeably, and new growth appears within 48 hours of increased light exposure. The 10-14 day hardening period is your safety net—don't rush it, even if seedlings look strong. I've transplanted over-confident seedlings that wilted within hours because they weren't properly hardened.
Pro Tips for Seed Germination Definition
- A few science-backed details that'll transform your seed-starting success rate from hit-or-miss to consistently relia...
- Precision Timing for Pre-Soaking: The 12-hour pre-soak in Step 1 is non-negotiable for most seeds—it's when the seed ...
- Temperature Control Strategy: Those 55-65°F and 75-85°F ranges in Step 1 aren't just suggestions—they're biological t...
Frequently asked questions
Got questions about seed germination?
You’re not alone! Here are answers to the most common queries—from timing to troubleshooting—to help you grow confidently.
How long does it take for seeds to germinate?
Germination time varies by seed type. Fast growers like radishes or lettuce sprout in 3–7 days, while slower seeds (e.g., beans or tomatoes) may take 7–21 days. Check the seed packet for specifics—patience is key!
Why aren’t my seeds sprouting? Troubleshooting tips
Seeds fail to germinate for common reasons:
- Too dry or too wet soil: Keep moisture consistent (like a damp sponge).
- Incorrect temperature: Most seeds need 65–75°F; use a heat mat if needed.
- Old or stored improperly: Test viability by soaking seeds in water—floaters are likely dead.
- Depth issues: Plant too deep? Some seeds (e.g., carrots) need light to germinate.
Can I germinate seeds without soil?
Try paper towel germination:
- Moisten a paper towel and place seeds between two.
- Roll it up and store in a sealed bag.
- Keep in a warm, dark spot until sprouts appear (usually 3–10 days).
- Transplant carefully once roots form.
Do seeds need light to germinate?
Nope! Seeds germinate best in darkness—light is for seedlings after sprouting. Cover containers with a lid or keep them in a drawer until you see tiny shoots. Once they break the surface, move them to a sunny spot.
How can I speed up germination?
Boost your success with these pro tips:
- Soak seeds overnight (except tiny ones like lettuce) to soften the outer shell.
- Use a seedling heat mat (60–75°F) for faster sprouting.
- Try chitting (pre-sprouting) for potatoes or tomatoes by placing them near a sunny window.
- Avoid overwatering—consistency is more important than saturation.
Wrapping up and next steps
Understanding seed germination definition isn’t just about science—it’s your gateway to growing thriving plants! Whether you’re a beginner or a seasoned gardener, mastering the basics of moisture, temperature, and light ensures your seeds sprout reliably.
Now that you’ve got the how-to, it’s time to roll up your sleeves and experiment—start with easy-to-germinate seeds like beans or marigolds to build confidence.
🌱 Next step: Pick your favorite seeds, gather your supplies, and watch life unfold right before your eyes! Happy planting! 🌱