
Lawn
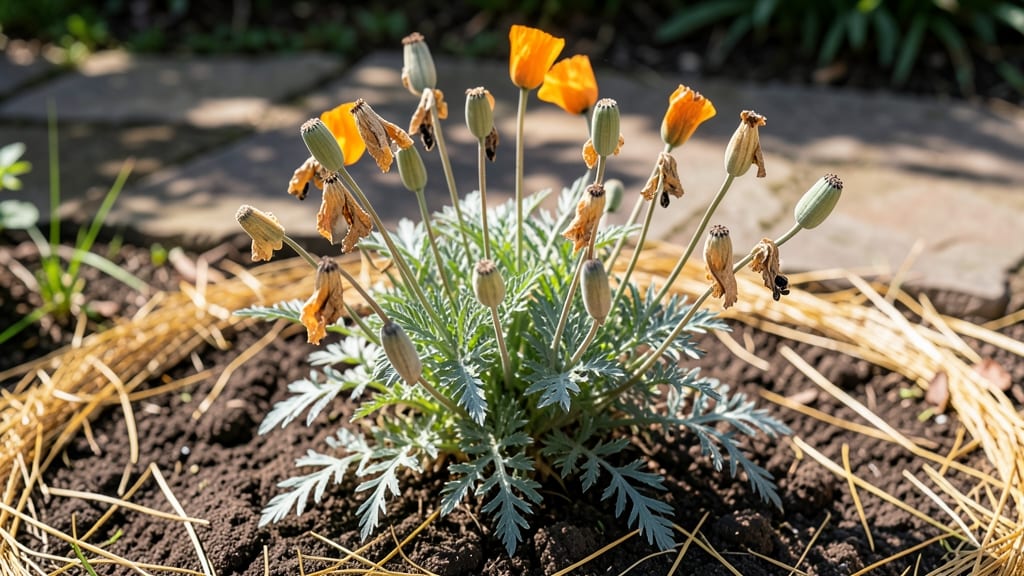
California poppy seed pods hold the secret to next year's golden blooms—without the brutal twist-and-pull method that ruins delicate stems. 🌻 I learned the hard way that forcing these papery pods open too soon crushes the seeds inside, but there's a gentle alternative that preserves every one for planting.
The magic happens in late summer when pods turn from green to dry brown. Leave them on the plant until they're completely crispy to the touch—this ensures maximum seed viability.
Once ready, simply snip the stems and hang them upside down in a paper bag until the pods release their seeds naturally. You'll end up with hundreds of tiny, black seeds that store for years in a cool, dry place.
The key is patience: rush the process, and you'll lose seeds to wind or premature release. Let nature do the work, and you'll have a head start on next spring's meadow. Perfect for wildflower mixes, pollinator gardens, or simply filling gaps in your landscape.
These seeds are tough—just don't let them sit in damp conditions after harvest, or they'll lose viability faster than you'd expect.
📚 In This Guide
- What you need
- Instructions
- Tips and common mistakes
- Wrapping up and next steps
What you need
- ● California poppy plants (mature, with fully dried seed pods—typically late summer to early fall).
- ● Brown paper bags (2–3 medium-sized, 12"x15" or larger) for collecting pods.
- ● Sharp scissors or pruning shears (clean, sterilized to avoid disease spread).
- ○ Gloves (optional but recommended)—gardening gloves to protect hands from prickly stems.
- ● Newspaper or cardboard (a large sheet for drying pods indoors).
- ● Small hand trowel (for digging up stubborn pods if needed).
- ● Fine-mesh sieve or colander (to separate seeds from chaff later).
- ● Spray bottle with water (to lightly mist pods if they’re stubbornly closed).
- ● Labeling tags & permanent marker (to track varieties if saving seeds for next year).
- ● Dry, sunny weather—harvest pods on a clear day when humidity is low.
- ● Patience—wait until pods are fully brown and papery (they’ll open on their own!).
- ● Designated drying space—a warm, dry, well-ventilated area (like a garage or shed).
Step-by-step instructions for harvesting California poppy seed pods
Here’s how to collect seed pods without damaging the delicate stems—so you’ll have fresh blooms next season.
🌿 Step 1: Wait for Pods to Fully Mature
Harvest pods only when they’ve turned a dry, papery brown and start splitting open naturally. If you pick them too early, the seeds won’t be viable. I check pods in late summer or early fall, when the stems feel crispy and the seeds rattle inside.
Gently squeeze a pod between your fingers—if seeds spill out easily, it’s ready. Avoid harvesting if pods are still green or if seeds feel damp inside. Wet seeds won’t store well and may mold.
💧 Step 2: Cut Stems at the Base
Use clean, sharp scissors or pruners to snip stems about 2 inches below the seed pod. Cutting too close risks damaging the root system, while leaving too much stem weakens the plant. I like to harvest on a dry morning so stems stay sturdy.
Place cuttings in a brown paper bag (not plastic—it traps moisture). Shake the bag gently to release any loose seeds, then tie the top loosely. This prevents seeds from scattering while allowing airflow to dry them further.
☀️ Step 3: Dry Pods Completely Before Storage
Spread the seed pods in a single layer on a clean, dry surface in a warm, dry spot (around 70-75°F) for 7-10 days. Avoid direct sunlight—it can overheat pods and ruin seeds. I use a mesh screen or cardboard box with holes for airflow.
Stir the pods occasionally to ensure even drying. They’re ready when completely brittle and seeds no longer feel damp. If any pods mold or smell musty, discard them immediately—this means they were too wet during storage.
⏰ Step 4: Store Seeds Properly for Next Year
Once fully dry, gently crush the pods by hand to release seeds into a small envelope or airtight container. Label with the harvest date—California poppy seeds stay viable for 2-3 years if stored correctly.
Keep seeds in a cool, dark place (like a pantry or fridge) to prevent moisture buildup. I use a sealed glass jar with a desiccant packet to absorb any lingering dampness. Check periodically for pests—if you spot webbing or tiny insects, freeze the seeds for 48 hours to kill them.
🌱 Step 5: Plant Seeds for Next Season
Sow seeds in early spring (after the last frost) in well-draining soil with full sun exposure. Scatter seeds on the surface—California poppies don’t need light coverage. Press them lightly into the soil, then water gently to settle them in.
Seeds germinate best in 60-70°F soil. Keep the area moist but not soggy until sprouts appear (usually 10-14 days). Thin seedlings to 6-12 inches apart once they’re 2 inches tall—crowding weakens stems and reduces blooms.
Tips & tricks for perfect California poppy seed collection
These simple tricks will help you harvest California poppy seed pods without damaging the plants—and ensure you get the best seeds for next year.
Timing is Everything: Harvest pods in the morning when stems are sturdy and dew has evaporated. This reduces breakage and makes cutting cleaner. I’ve found that late summer mornings (around 8-10 AM) give me the best results—stems are firm but not brittle from afternoon heat. If you must harvest later, wait until the pods have fully dried and stems feel crispy.
Tool Selection Matters: Use clean, sharp pruners or scissors—dull blades crush stems and damage roots. I keep a small pair of pruners dedicated just to harvesting poppies to avoid cross-contamination with other plants. For larger patches, a serrated knife works well, but always cut at the base to avoid tearing delicate stems.
Drying Strategy: For even drying in Step 3, consider using a mesh screen or an old window screen elevated slightly off the ground. This improves airflow and prevents moisture buildup underneath. I’ve had success placing mine on top of a wooden crate in a garage with a small fan blowing gently—just don’t let it blow directly on the pods. Stir pods every 2-3 days to prevent uneven drying.
Storage Wisdom: When storing seeds in Step 4, add a small packet of silica gel (the kind that comes with new shoes) along with the desiccant packet. This extra step helps absorb any residual moisture that might cause seeds to clump or mold over time. I label my containers with both the harvest date and the year—this helps me track seed viability and plan my planting schedule.
Pro Tips for California Poppy Seed Pods
- These simple tricks will help you harvest California poppy seed pods without damaging the plants—and ensure you get t...
- Timing is Everything: Harvest pods in the morning when stems are sturdy and dew has evaporated. This reduces breakage...
- Tool Selection Matters: Use clean, sharp pruners or scissors—dull blades crush stems and damage roots. I keep a small...
Frequently asked questions
Got questions about harvesting those iconic California poppy seed pods? You’re not alone! Here are answers to the most common curiosities—from timing to troubleshooting—so you can gather seeds like a pro without stressing your plants.
When is the best time to harvest California poppy seed pods?
Harvest pods when they’re dry and papery but before they split open—usually 4–6 weeks after blooming. Morning harvests work best when dew has dried, and pods are crisp to the touch. Avoid rain or humidity, which can cause mold or premature seed loss.
How do I remove seeds from pods without twisting them off?
Gently squeeze the pods between your fingers or use a soft brush to coax seeds out. Twisting risks damaging stems or leaving behind empty pods. For stubborn pods, try tapping them lightly over a bowl—seeds will fall out naturally. Pro tip: Wear gloves to avoid skin irritation from sap!
Can I collect seeds from California poppies grown from store-bought plants?
Yes, but expect variable results. Store-bought poppies may not produce true-to-type seeds due to hybrid breeding. For consistent blooms, save seeds from open-pollinated varieties or local wild populations. If you’re unsure, label pods by parent plant for tracking.
What should I do if my seed pods turn black or moldy?
Black/moldy pods signal overripe seeds or fungal issues. Discard affected pods immediately to prevent spread. Improve airflow by spacing plants further apart, and avoid overhead watering. If mold persists, treat soil with neem oil or copper fungicide before replanting.
Are there alternatives if my pods don’t produce seeds?
If pods fail to form, check for pests (aphids, earwigs), poor pollination, or nutrient deficiencies. Hand-pollinate flowers with a soft brush, or try fertilizing lightly with compost next season. For guaranteed seeds, buy fresh seed pods from reputable nurseries or swap with local gardeners!
Wrapping up and next steps
Harvesting California poppy seed pods is a rewarding way to ensure next year’s vibrant blooms while embracing a gentle, twist-free approach. By following the right timing, tools, and techniques, you’ll preserve seed quality and encourage lush regrowth—all without stressing your plants.
Ready to plant the seeds of next season’s beauty? Grab your gloves, head outdoors, and start collecting those pods today!
Next step: Share your progress or ask questions in gardening communities—your fellow green thumbs will love seeing your poppy pod harvest! 🌻