
Lawn
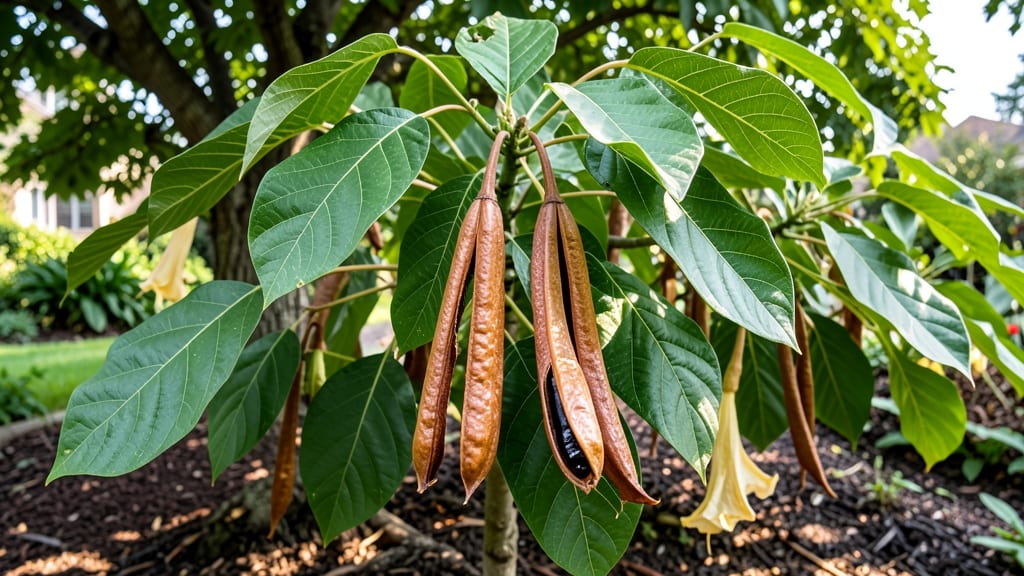
Those brugmansia seed pods look like something out of a jungle fantasy—until you realize they’re packed with potential for next year’s garden. 🌿 I’ve harvested dozens, and the key to success isn’t waiting until they’re dry as bones but collecting them at just the right moment when they’re still plump and starting to crack open.
The pods themselves are the size of a baseball and covered in a fuzzy, velvety texture—almost like nature’s own plush toy. But don’t let their appearance fool you; they’re also toxic, so wear gloves when handling them.
Once you’ve collected them, the real work begins: extracting the seeds and preparing them for stratification, which mimics the natural winter chill they need to break dormancy.
With the right timing and care, you’ll see those first tiny sprouts within 4-6 weeks of sowing. The seedlings grow fast once they get going, and before you know it, you’ll have a head start on growing your own brugmansia—saving money and getting exactly the varieties you love.
Just be patient; these seeds don’t rush, but they’re worth the wait.
If you’ve ever struggled with moldy seeds or slow germination, I’ll share my foolproof method for keeping everything healthy and on track. No more wasted effort—just reliable, jungle-worthy blooms waiting to happen next season.
📚 In This Guide
- What you need
- Instructions
- Tips and common mistakes
- Wrapping up and next steps
What you need
- ● Mature brugmansia seed pods: Wait until pods turn brown and begin to split open naturally (usually late summer to fall). Aim for at least 5-10 healthy pods for viable seeds.
- ● Pruning shears or sharp scissors: Sterilized tools to snip pods cleanly from the plant (avoid damaging stems).
- ● Paper towels or newspaper: For drying and separating seeds from pulp.
- ● Paper bags or breathable mesh bags: To store pods/seeds while drying (avoid plastic to prevent mold).
- ● Labeling tags & permanent marker: To mark pods by variety/date (trust us, you’ll thank yourself next spring!).
- ● Small container with lid: For storing dried seeds (e.g., airtight jar or envelope).
- ○ Gloves (optional but recommended): Brugmansia sap can irritate skin—wear nitrile gloves for safety.
- ● Seed viability test kit: Quick tests (like floating seeds in water) to check for good germination potential.
- ● Humidity-controlled drying area: A dehumidifier or fan to speed up drying if your climate is damp.
- ● Notebook: To log pod maturity dates, seed counts, or germination notes for future reference.
- ● Seed-starting mix: If you plan to germinate seeds immediately (sterilized potting soil works best).
How to harvest brugmansia seed pods for successful germination
Here's the simple method I rely on to collect and store brugmansia seeds that sprout reliably the following spring.
🌿 Step 1: Identify and Select Mature Seed Pods
Brugmansia pods mature when they turn from green to a papery brown color and begin to split open naturally. I wait until at least 50% of the pod is brown before harvesting—this ensures maximum seed viability. The pods should feel dry and papery to the touch rather than firm or leathery.
Look for pods that are hanging downward rather than upright—this indicates they're ready to release seeds. Avoid harvesting pods that are still green or show signs of mold, as these won't produce healthy seeds. Use clean pruning shears to cut the stem about 1 inch below the pod to prevent damage to the plant.
✂️ Step 2: Collect and Clean the Seeds
Once you've harvested the pods, place them in a paper bag (not plastic) and seal it loosely. Brugmansia seeds need airflow to dry properly. Shake the bag gently every few days to help the seeds separate from the pod material. This process usually takes 5-7 days until the pods are completely dry and crumbly.
After drying, open the bag and carefully remove the seeds by hand. Discard any remaining pod debris and damaged seeds. Store the clean seeds in a small envelope labeled with the variety name and harvest date. Brugmansia seeds are large and flat, resembling tiny beans—this makes them easy to handle once separated.
🪴 Step 3: Store Seeds for Optimal Germination
Place the envelope of seeds in a cool, dark location with 40-50% humidity. A sealed container with a silica gel packet works well for maintaining proper moisture levels. Brugmansia seeds require stratification—a cold period—to break dormancy, so store them in the refrigerator for 8-12 weeks before sowing.
Check the seeds periodically to ensure they remain dry but not brittle. If you notice any signs of mold or moisture buildup, transfer them to a new envelope with fresh silica gel. After stratification, you can move the seeds to a warm, dry place until you're ready to plant them in spring.
☀️ Step 4: Prepare for Spring Planting
When you're ready to sow the seeds, fill small seed-starting trays with well-draining potting mix and moisten it until damp but not soggy. Plant the seeds ¼ inch deep, spacing them about 1 inch apart in the tray. Brugmansia seeds germinate best at 70-75°F, so use a seedling heat mat if your home runs cooler.
Keep the soil consistently moist but not waterlogged, and place the trays in a bright, indirect light location. Germination typically occurs within 2-4 weeks, though some seeds may take longer. Once seedlings emerge, provide 12-14 hours of light daily to prevent leggy growth.
💧 Step 5: Maintain Seedlings Until Transplanting
After the seedlings develop 2-3 sets of true leaves, they're ready to be transplanted into 4-inch pots with fresh potting mix. Brugmansia seedlings are sensitive to root disturbance, so handle them carefully during this process. Water the seedlings gently at the base to avoid disturbing the soil around the roots.
Continue to provide bright, indirect light and keep the soil moist but not waterlogged. Once the seedlings are 6-8 inches tall and the weather has warmed, they can be transplanted outdoors after the last frost date. Brugmansia thrives in full sun to partial shade, so choose a location with protection from strong afternoon winds.
Tips & tricks for perfect brugmansia seed pod harvesting
These simple tricks will help you maximize seed viability and avoid common pitfalls when harvesting brugmansia pods.
Pod Selection: When harvesting, focus on pods that are hanging downward—they're ready to release seeds. I've learned that pods with 50% brown coloration produce the most viable seeds. If you're unsure, gently squeeze the pod—it should feel dry and papery, not firm. This texture test is your best indicator of readiness. The dryness prevents mold and ensures seeds aren't still developing.
Drying Strategy: The 5-7 day drying period in a paper bag is crucial for seed separation. I place the bag in a well-ventilated area with indirect sunlight—direct sun can overheat and damage seeds. Shake the bag every other day to help loosen seeds from the pod material. This gentle agitation mimics natural seed dispersal and prevents clumping. If you're short on time, you can speed up drying by placing the bag in a warm, dry spot (like above a radiator), but monitor closely to avoid overheating.
Stratification Timing: The 8-12 week cold stratification is non-negotiable for brugmansia seeds—it mimics winter conditions and breaks dormancy. I store mine in a sealed container with silica gel packets to maintain 40-50% humidity. During this time, check your seeds every 2-3 weeks: they should remain dry but not brittle. If you forget to check, don't panic—just transfer to a fresh envelope with new silica gel. The cold period is what ensures reliable germination next spring.
Planting Preparation: When it's time to plant, focus on the ¼ inch depth—any deeper and seeds may struggle to emerge. I use a small pencil to make planting holes for consistency. For the 70-75°F germination temperature, a seedling heat mat is worth the investment if your home runs cooler. Place trays on the mat and cover with plastic wrap to create a mini greenhouse effect until you see sprouts. This setup keeps moisture levels perfect for germination.
Pro Tips for Brugmansia Seed Pods
- These simple tricks will help you maximize seed viability and avoid common pitfalls when harvesting brugmansia pods.
- Pod Selection: When harvesting, focus on pods that are hanging downward—they're ready to release seeds. I've learned ...
- Drying Strategy: The 5-7 day drying period in a paper bag is crucial for seed separation. I place the bag in a well-v...
Frequently asked questions
When are brugmansia seed pods ready to harvest?
Harvest pods when they’re dry and papery (usually 3–5 months after flowering). They’ll turn from green to brown and split open naturally—or gently twist them off when they rattle inside. Pro tip: Wait until pods are fully mature to avoid collecting underripe seeds that won’t germinate!
Are brugmansia seed pods toxic like the plant?
Yes! While the seeds themselves aren’t as concentrated as the leaves, they still contain tropane alkaloids (like atropine). Wear gloves when handling pods, and never ingest them. Keep kids and pets away from harvested seeds until you’re ready to plant.
Can I save brugmansia seeds from store-bought flowers?
Probably not reliably. Many nursery plants are hybrids or grown from cuttings, so their seed pods may not produce true-to-type offspring. For consistent results, save seeds from open-pollinated plants in your garden or order from a reputable seed supplier.
How long do brugmansia seeds stay viable?
Fresh seeds germinate best, but they can stay viable for 2–3 years if stored in a cool, dry place (like a sealed envelope in the fridge). Label pods with the harvest date to track freshness. Fun fact: Some gardeners swear by a quick cold stratification (4 weeks in the fridge) to boost germination!
What if my brugmansia pods shrivel before opening?
This could mean overripe pods (seeds already dispersed) or fungal issues (like powdery mildew). If pods dry out too fast, try harvesting them slightly earlier when they’re still firm. For moldy pods, discard them immediately to prevent spreading. Prevention tip: Ensure good airflow around your plant!
Bonus: Can I dry brugmansia pods indoors?
Lay pods on a screen or paper towel in a well-ventilated spot (like a sunny windowsill) for 1–2 weeks. Avoid direct heat (like an oven or heater), which can crack them open prematurely. A dehumidifier nearby helps speed up the process!
Wrapping up and next steps
Harvesting brugmansia seed pods doesn’t have to be a daunting task—with the right timing, tools, and patience, you can ensure viable seeds for next year’s garden.
Whether you’re a seasoned gardener or just starting out, mastering this process opens the door to growing these stunning, fragrant plants with confidence. Now’s the perfect time to put your new knowledge into action!
Ready to take the next step? Start by monitoring your plants for ripe seed pods this season—your future garden will thank you! 🌱