
Lawn
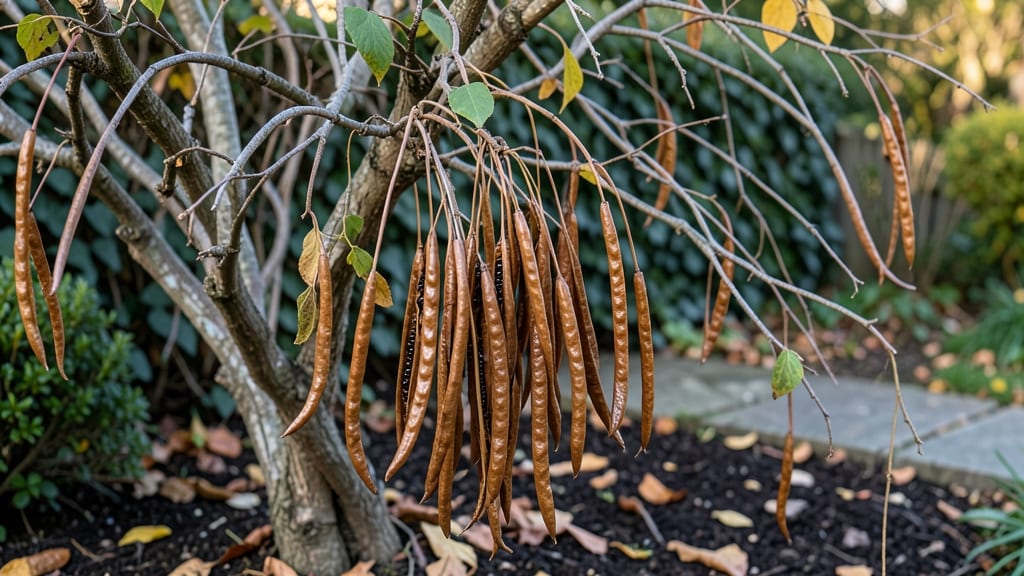
The moment wisteria seed pods turn from green to papery brown is your cue to act. 🌿 These unique pods hold the potential to grow new vines—if you know how to handle them right.
I’ve watched my wisteria’s pods transform from spring’s fuzzy green to autumn’s dry husks, and each one holds a story of what’s possible if you’re patient.
Harvesting these pods is simple: wait until they’re fully brown and brittle, then gently twist them off the vine. The real work starts with understanding their quirks—wisteria seeds need cold stratification (a winter chill) to break dormancy, and germination can take months, not weeks.
That’s why timing matters: collect pods in late fall or early winter for the best results.
With the right care—well-draining soil, full sun, and a little extra patience—you’ll see those first pale green leaves emerge by spring. The vines grow slowly at first, but once established, they’ll reward you with years of fragrant blooms. Just don’t expect instant gratification; wisteria’s magic unfolds over time.
If you’re new to this, start small: try one or two pods in a pot before committing to the garden. And remember, even if some don’t sprout, the process itself is part of the joy—learning how nature works in its own time.
The key is consistency: keep the soil moist but not soggy, and protect young seedlings from harsh winds.
📚 In This Guide
- What you need
- Instructions
- Tips and common mistakes
- Wrapping up and next steps
What you need
- ● Fresh or dried wisteria seed pods: 5–10 pods (ensure they’re fully mature—brown and slightly papery). Pro tip: 🌡️ Harvest in late fall or winter when pods are dry but haven’t split open yet!
- ● Pruning shears or sharp scissors: 1 pair (for cleanly snipping pods from vines).
- ● Paper towels or newspaper: 2–3 sheets (for drying and separating seeds).
- ● Small mesh bag or breathable container: 1 (to store pods until processing).
- ● Fine-mesh strainer or sieve: 1 (for sifting seeds from chaff).
- ● Labeling tags & marker: 1 set (to track seed varieties if mixing types).
- ● Seed-starting trays or small pots: 2–4 (for germinating seeds indoors).
- ● Potting mix: 1 small bag (well-draining, like a cactus/succulent blend).
- ● Heat mat or warm location: 1 (wisteria seeds germinate best in warmth, ~70–75°F).
- ● Spray bottle with water: 1 (for lightly misting seeds during stratification).
- ○ Glove (optional): 1 pair (wisteria pods can be sticky or irritating to some skin!).
Step-by-step guide to harvesting wisteria seed pods naturally
Here's how to collect seeds without waste—just wait for nature to do the work.
🌿 Step 1: Identify and Select Mature Seed Pods
Wisteria seed pods typically ripen in late summer to early fall, turning from green to brown and papery. Look for pods that feel dry and papery to the touch—these are ready for seed release. I always check my wisteria vines after the first frost, as cold temperatures help dry the pods completely.
Gently shake the vine or individual pods over a clean bucket or paper bag. You'll hear seeds rattling inside when they're ready. Avoid pods that are still green or leathery—they won't release seeds properly. This natural drying process ensures only fully mature seeds are collected.
⏰ Step 2: Time the Seed Release Process
Wisteria pods release seeds in a dramatic burst when fully mature. On a dry, sunny day, place a bucket or bag beneath the vine and give the pods a gentle shake. You'll see seeds and chaff rain down—this is the perfect moment to catch them all. I like to do this in the morning when the pods are dry and seeds are loose.
If pods don't release seeds immediately, leave them on the vine for another week. Overripe pods may split open on their own, scattering seeds everywhere. Collect any fallen seeds promptly to prevent loss. This process usually takes about 2-3 weeks from when pods first turn brown.
🪴 Step 3: Clean and Store Collected Seeds
Once seeds are collected, spread them on a clean, dry towel to air-dry for 24 hours. This prevents mold from any remaining moisture. I use a mesh screen or paper towel to separate seeds from chaff easily—just give it a gentle shake over the towel. Discard any empty or damaged seed pods.
Store seeds in a paper envelope or small mesh bag in a cool, dry place. Label with the collection date—wisteria seeds remain viable for 1-2 years if stored properly. Keep them away from direct sunlight or heat, which can reduce germination rates. This simple storage method preserves seed quality until planting time.
🌱 Step 4: Prepare Seeds for Planting (Optional)
Wisteria seeds require stratification to break dormancy. Place seeds in a plastic bag with slightly damp sand or peat moss, then refrigerate for 3-4 months. Check monthly to ensure the mix stays moist but not soggy. This cold treatment mimics winter conditions and encourages germination.
After stratification, sow seeds ½ inch deep in well-draining soil. Keep the soil consistently moist but not waterlogged. Germination can take 4-6 weeks, so be patient. I always plant a few extra seeds—wisteria germination rates can vary. This method ensures stronger, healthier seedlings ready for transplanting in spring.
Tips & tricks for perfect wisteria seed collection
Between us, these little details make all the difference when harvesting wisteria seeds without losing a single one.
Timing Secret: The 2-3 week window after pods turn brown is your golden opportunity. I've learned the hard way that waiting too long means pods split open on their own, scattering seeds everywhere. Mark your calendar when you notice the first brown pods—this is when the real fun begins! If you're in doubt about ripeness, give them a gentle squeeze: mature pods should feel dry and papery, like crumpled paper.
Collection Strategy: Here's what nobody tells you—use a large, lightweight sheet or tarp instead of just a bucket. When you shake the vine, seeds and chaff will rain down everywhere. A sheet catches everything neatly, and you can just fold it up with all the seeds inside. Plus, you can shake the sheet gently over your collection container to separate seeds from debris. This method saves me from chasing after lost seeds all over the yard.
Storage Wisdom: That 24-hour air-drying period after collection is non-negotiable. I've seen mold develop when people skip this step, especially if the pods were collected after rain. Spread seeds on a clean towel in a well-ventilated area—somewhere with gentle airflow but no direct sunlight. A mesh screen works perfectly if you want to separate seeds from chaff while they dry. Trust me on this: taking 24 hours now prevents headaches later.
Stratification Hack: For the 3-4 month cold treatment, I use a simple plastic bag with damp sand instead of fancy peat moss. Just mix equal parts sand and water until it's damp like a wrung-out sponge, then add your seeds. Seal the bag loosely (you want some airflow) and store it in your refrigerator's crisper drawer. Check it monthly to ensure it's still moist—this mimics natural winter conditions perfectly without needing a fancy setup. The key is consistency: keep that mix evenly damp throughout the entire process.
Pro Tips for Seed Pods Wisteria
- Between us, these little details make all the difference when harvesting wisteria seeds without losing a single one.
- Timing Secret: The 2-3 week window after pods turn brown is your golden opportunity. I've learned the hard way that w...
- Collection Strategy: Here's what nobody tells you—use a large, lightweight sheet or tarp instead of just a bucket. Wh...
Frequently asked questions
Got questions about wisteria seed pods? You’re not alone—these unique botanical features spark curiosity (and sometimes confusion!). Below, we’ve rounded up the most common queries to help you navigate seed pod season like a pro.
When do wisteria seed pods form and how long do they last?
Wisteria seed pods typically appear in late spring to early summer after the flowers bloom. They start green, harden into brown pods by summer, and may persist into fall or winter—sometimes even through mild winters. Once dry, they’ll eventually split open to release seeds, usually within 2–4 months of forming.
Are wisteria seed pods toxic or harmful?
Yes! While the pods themselves aren’t highly toxic, they contain seeds that can be poisonous if ingested—especially to pets and children. Symptoms may include vomiting, diarrhea, or dizziness. Always wear gloves when handling them, and keep them away from curious pets or kids.
How can I encourage natural seed release without damaging the plant?
Let nature do the work! Once pods turn brown and papery, gently tap them with a stick or shake the plant lightly to release seeds. Avoid cutting them off prematurely—this can stress the plant. If pods cling stubbornly, wait until they’re fully dry (they’ll split on their own).
What should I do with empty seed pods after they’ve released seeds?
Empty pods add texture to gardens but can look messy. Remove them by hand (wear gloves!) or prune them in early spring before new growth starts. Alternatively, leave a few for aesthetic interest—just rake up debris to keep your lawn tidy.
Can I propagate wisteria from seed pods, or should I use cuttings?
While you can grow wisteria from seeds, it’s a slow process (5–10 years for flowers!) and results are unpredictable. For faster, more reliable growth, use hardwood cuttings in late winter or purchase a grafted plant. Seeds are better for experimentation or wildflower gardens.
Pro Tip:
Mark your calendar! Wisteria seed pods follow a predictable timeline—track their formation to plan for cleanup or propagation. And if you’re dealing with invasive wisteria, remove pods immediately to prevent spreading.
Wrapping up and next steps
Harnessing wisteria seed pods for natural seed dispersal isn’t just eco-friendly—it’s a rewarding way to propagate your garden while embracing zero-waste principles. 🌱 Whether you’re a seasoned gardener or just starting out, this method offers a simple, cost-effective solution to spread beauty without harming the environment.
Now that you’re equipped with the know-how, why not give it a try? Start by collecting those pods this season and watch your garden flourish with new life—naturally and sustainably!
🌿 Ready to Grow?
Take the next step: Plan your wisteria propagation project today and share your zero-waste journey with fellow green thumbs!